Watching a few days after the Pi 500 plus release, I wish @raspberrypi had leaned more to this than the plus, (full size hdmi etc)
@1914grant Says:
Reminds me very much of the BBC Micro case
@BottomBurp666 Says:
Love the build, the shape and colour of the case reminds me of a BBC Micro
@rafaveggi Says:
Very ingenious, great build! We can see you had a good time building this machine
@typxxilps Says:
1 year later I came back again from the Pi 500 best keyboard PC where you showed your own built at the end which meant for me it might be time to go for that too cause it is built without compromises that would hurt me (like smallest case on earth). And you can improve the shortcommings or forgotten points later like small micro and speaker.
@ArmChairPlum Says:
Looks like you might have room in that to slap a floppy disk reader - for that retro aesthetic.
Heck, might you be able to run commodore games on it! - Blood Money!
Course good luck with the IDE connector on it 🙂
@wizzardrincewind9458 Says:
👍🖖
@toma01001 Says:
Ahh, it even looks like an Acorn Electron. Hell yeah
@mohanv88 Says:
Someday raspberry will sell a laptop and still call it single board
@AndrewHelgeCox Says:
Interesting to see something like this made without lots of 3D print iterations, and the result is great!
@10MILLONESDEVECES Says:
There were many reviews of Rpi 500 but i was expecting yours. As usual very objetive and clear. Greetings Chris !!
@hurricane31415 Says:
Impressive build.
@fatihonal6273 Says:
Wow, i am really impressed! Great job! Well done!
@dmkays Says:
I think that for color, you should have painted it Raspberry Red.
@anti-cmos1349 Says:
Love it, but it's more of an A600 clone.
@ryanbrownnew Says:
This would be really neat to see with a mechanical keyboard
@michaeldemers2716 Says:
It should have been hot pink.
@valveman12 Says:
Well done, Christopher! I really like the retro look👍👍
@raddaks2039 Says:
Bro made a better pi 500 a year earlier than the official one. Even with an m.2 drive, which the official did not have.
@kirishima638 Says:
A year later and your Pi 500 is better than the real one!
M.2 - nope!
Full HDMI - nope!
Active cooling - nope!
@MeneGR Says:
It's official. Not only this is the first Pi 500, it's also the best Pi 500! Proper sized HDMI port, NVMe support, and still has a Num Lock key!
@jierenzheng7670 Says:
THIS IS INTERESTING. I am thinking of building something like that to act as a folio keyboard for an iPad (with keyboard the iPad turns into a linux PC) but on the go it works as an iPad.
@WJCTechyman Says:
Interesting build. Would the Amiga you modeled this after been beige like that? I ask because looking at other similar Commodore computers like the later version of the 64 and 128 both have a fairly white looking shell, or at least they do after the retro-bright process.
@PhilipBallGarry Says:
Revisiting this video, I'm considering building this with the Radxa X4 inside 😊
@polocatfan Says:
the fact they haven't released a pi 500 is crazy. I'd absolutely upgrade if they ever did.
@otopico Says:
Seeing this come together put a smile on my face. The idea of a modern computer in the form of a small A500 using the new RPi5 is such a great thing.
@SebBrosig Says:
Colour should be "Raspberry ripple"
@magicalsynthadventure3216 Says:
That colour looks a little more BBC model B than Amiga to me 😅, great work though. Could I get in touch with you about a possible video collaboration? I have a few ideas.
@theburntcrumpet8371 Says:
8 months later - is this still being put to good use? I've just dug out my Pi 400 from a box and forgot how nice it is having the computer just there, in the keyboard
@manusmcmanus9330 Says:
Can cases like this be bought off the shelf??
@ginacallegari9053 Says:
And how you connect the keyboard?????
@EarnestWilliamsGeofferic Says:
Just dropping a comment because I came back to this video. Great resource.
@Donzig240B Says:
awesome project. good old fashion ingenuity.
@Mbro-dq2do Says:
jesus chris. You're a G-d damn Genius!! Well done dude. Cheers from Chicago!!
@williamBryan-k2e Says:
a change to make it easier.. It seems that most folks do not understand that sd/msd cards come in very fast versions. I use that on my pie for 'alternative OS tests. On your build, migh want to drop the usd to mvme adapter and nvme card. so just buy fast msd and put os on that. cheaper and easier. Just a recommedation - so I still love the project. ( some mention life expectancy of sd cards - so this might be a downside of sd card - but it it only holds os - not data -might be acceptable risk ).
@tonyhampton7736 Says:
why not paint it "raspberry" color?
@danilobatista5298 Says:
Muito legal. Vou tentar fazer também.
@Da_GrandiMan Says:
Nice Vid,
Well explained.
How about a removable, sliding, hindged flat screen monitor ?
Then call it an, "All in one Pi500++" (+ Nvme SSD + flat screen monitor)
Some yokel !
Will call it a laptop - hmmm "Pi500 Laptop"
"Laaap top yu-mmmmm" - Homer $impson
@PsiQ Says:
Hmm.. for cooling i'd suggest adding an air channel feeding towards the fan, so it pulls in outside air.
OR:
Mounting the Pi5 upside down and using a metal base plate (connected to gnd for ESD reasons) for the complete computer and a passive cooling option.
This would also fit with the now available nvme bases going on the bottom. Also increases the haptic when handling the pc,
like the chinesium products containing stones or scrap metal as dummy weights.
Overall lots of time went into that and i wouldn't have the time or nerves to do that.. I think i'd have used wood ;-)
Now it's only missing a "portable tablet monitor" going on the bottom, that can be stuck on during usage.
@Ikantspell4 Says:
I miss beige computers.
@ravesab Says:
A next project to make a laptop with its battery and screen with a Raspberry 5 would be possible?? Greetings from Madrid
@zoltanbernaczki9063 Says:
This is beautiful.
@Szudi_Zlav Says:
Chris! I respecting this idea but please! Not that round shape! I like retro and I love my Amiga 600, but don't exaggerate! The A500 was already available in this color. If you do this to the pi500, I'll probably try to transfer it to the older pi400, where the design was wonderful and I wouldn't change anything! I wolud only add: audio out, large HDMI port, active cooling (need in PI5) and port for M.2 disk ;)
@martyndeyoung8207 Says:
Hmmm. Nice build. A black keyboard and red function keys would give it a BBC Micro-esque appearance! :) I might have a go at that, thanks!
@genjieching2016 Says:
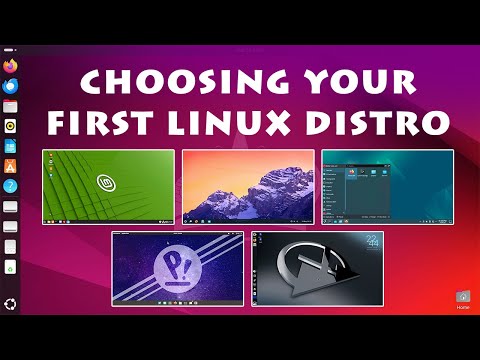
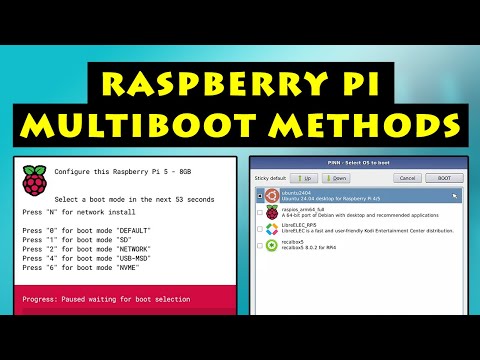
What is Pi 500 and Pi 5?
@LeeWelding-vq4eo Says:
Hi Chris, great work on the pi500 case, if I become a member and pay the subscription every month, will it be possible to have the cut out dimensions of the case that you have made? Would that be in the members video 22? I have ordered everything from Amazon to do the same project case as you have, only thing I need to do is now find some spray paint of my choice for the case thanks
@DanielYuStar_Pachirisu_Feet Says:
dear god this is what i always wished for, if there was a case like this for mechanical keyboards being, i would buy one
@ucmRich Says:
Massively impressive pal!!! :-D you should make a kit and sell it ^_^
@AndreyPaskal Says:
Very nice computer with keyboard! But. If you don't mind, I think this keyboard angle is not very suitable for touch typing. It will be much more ergonomic to place the keyboard on top of the box. This way there will be part of the palm rest underneath the keyboard. Yes, for this scheme the general shape will have to be changed a little. The top surface will be completely flat. And the angle of the top surface will be minimal. About 2-3 degrees. Of course, you will lose the retro design vibe, but the new design will be much more functional in my opinion.
@MinstrelKrampf Says:
A couple of years ago, I found an old Atari 600XL case, and immediately had plans to turn it into the Atari 600XL that many of us wished Atari made. I installed a Raspberry Pi 4, and thanks to Tinmouth Software in the UK, got an Atari Joystick and Keyboard adapter, so that they could be plugged into the USB ports on the Raspberry Pi. There was an emulator available that nearly perfectly emulates all the different Atari 8-bit computers. But after finishing the project, I grew bored, and decided that I wanted to emulate... Well EVERYTHING! So I downloaded retropie and started filling the SD card with emulators and software for Atari, Commodore, TRS-80, Sinclair Spectrum, and other 8-bit computers.
When I saw this video, I was impressed that Chris made many of the same choices -- like routing all of the Raspberry Pi's ports via patch cables, to the back of the case, and using a full-size HDMI jack, instead of relying on the tiny and more fragile micro-HDMI connectors. Many of the choices I made were dictated by the desire to preserve the Atari 600 case, so that I could reverse what I've done, just in case I find an Atari 600 board without a case or something. I mounted a USB hub in the spot where the Atari Parallel bus was. No cutting required -- the hub I got fit perfectly. I did not trim or cut anything from the case, but rather used plastic to make port covers, onto which I mounted the Raspberry Pi's HDMI, USB-C, and ethernet ports.
When the Raspberry Pi 5 came out, I wasted no time in getting one, and I upgraded my little Atari 600XL with it, and added a new keyboard and an M.2 SSD. I needed a real modern keyboard, because each of the emulators for the different systems used PC keyboard function keys to bring up menus and change settings. I did relent and had to cue the case top a tiny bit, because the keyboard was just a little larger than the hole for the original keyboard. Currently, i have Ubuntu 23.10 on the SSD, and as Chris has already demonstrated, it's very responsive and zippy!
You can see the original build here: https://www.youtube.com/watch?v=H-npVUSBeRw
OMG -- I made this 3 years ago! How time flies!
I'm soon going to build a retro case for a Mini-ITX motherboard. It will look like a retro-80's all-in-one system, but be a 4 Ghz gaming rig -- sideways mounted GPU, Flex ATX PSU, and so on. I've wanted to do that longer than I've wanted to do the Atari 600XL project, until I saw the tools Chris used, and now I have a better idea about getting better results from cutting and bending plastic, especially the tools that I hadn't seen before.


LATEST COMMENTS